04.24.2024 - 05.15.2024 / week 1 - week 4
Velicia Raquel Dewi Setiawan | 0369188 | Bachelor of Design (Honours) in Creative Media
Advanced Typography
JUMPLINK:
1. LECTURE
Week 1 - Recorded (Apr 24, 2024)
1. TYPOGRAPHIC SYSTEMS
Technical and Digital Media Competencies
- Use your software in a creative and effective, including E-portfolio!
Critical Thinking Competencies
- Right reading and research and from that you generate ideas from those ideas you explore sketches. So the point starts to diverge into multiple
- Areas, so you have multiple ideas and attempts at different ideas. Exploring, sketching, digitizing, and eventually going back to a point where you can narrow down the options you intend to submit.
- Evident in the E-portfolio
Strategic Communication Competencies
- Write and read!
- Explanations are essential analysis of your work - E-portfolio
Appraising and Valuing Competencies
- Reflection of who of you, of the process of your analysis, your strengths, and weaknesses are displayed throughout your entire e-portfolio.
Important Notes!!
- Make sure that your lecture summaries are concise, short, bullet-pointed
- Compile the visuals used
- Clear heading and subheading
- Every image needs to be labeled, described, and dated
- Write down the fonts used
- 300 PPI, 1024 pixels by 1024 pixels
- If you copy you must credit the source
- Inspiration from artwork you must declare it
"All design is based on a structural system" -Kimberly Elam, 2007
Eight Major Variations
- Axial
- Radial
- Dilatational
- Random
- Grid
- Modular
- Transitional
- Bilateral
Typographic Systems
- Generally, when you follow a particular system you are abdicating your intuition, and the designer's work happens to rely on intuition.
- When you have a guide in the beginning dealing with complex information then it is good to have a guide or direction to help understand typographic layout and composition.
- A handhold to go through the process of exploration while maturing your sense of intuition.
1. Axial
- All elements are organized to the left or right of a single-axis
 |
Fig 1.1 Axial, Week 1 (24/04/2024)
|
2. Radial
- All elements are extended from a point of focus
- There can be multiple points of focus
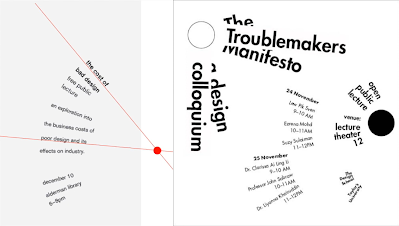 |
Fig 1.2 Radial, Week 1 (24/04/2024)
|
|
3. Dilatational
- All systems expand from a central point in a circular manner
- Hierarchical manner, the most important probably in the outer/inner rings
 |
Fig 1.3 Dilatational, Week 1 (24/04/2024)
|
|
4. Random
- Elements appear to have no specific pattern or relationship
- Very organized people tend to find great difficulty
 |
Fig 1.4 Random, Week 1 (24/04/2024)
|
|
4. Grid
 |
Fig 1.5 Grid, Week 1 (24/04/2024)
|
|
5. Transitional
- Informational system that is layered in banding
- Separate clubs of information into different bands
 |
Fig 1.6 Transitional, Week 1 (24/04/2024)
|
|
6. Modular
- The units (red squares) have to be standardized
- 2 standardized base units
 |
Fig 1.7 Modular, Week 1 (24/04/2024)
|
|
7. Bilateral
- All text is arranged symmetrically in a single-axis
 |
Fig 1.8 Bilateral, Week 1 (24/04/2024)
|
|
Week 1 - Recorded (Apr 24, 2024)
2. InDesign FORMATTING
Mr. Vinod has made a video to refresh us on InDesign formatting, this is the notes that I took on it.
- Allow spread shuffle
- Point size:
- Leading has to be 2 or 3 times the point size
- Add the point size :
- Add leading :
- Create guides :
- Align right :
- False break line :
- Kerning :
- Edit, Preference, Unit&increments, Kerning=5
- Alt, 'right arrow'
- For Numbers/time :
- Character formatting, Small capitals
- To write time use en dash :
- For association, use smaller leading / Bold
Week 2 - Recorded (May 1, 2024)
3. TYPOGRAPHIC COMPOSITION
Principles of design
- Emphasis
- Isolation
- Repetition
- Symmetry
- Asymmetry
- Alignment
- Perspective
- etc
However, these abstract notions seem ambiguous when it comes to translating them into a typographic layout or composition.
1. Emphasis
- Some of these principles are a little more easily translatable than others an example would be the emphasis.
 |
Fig 1.1 Emphasis, Week 2 (30/04/2024)
|
2. Rule of Third
- Space divided into three columns and three rows.
- Intersecting lines guide point placement.
- Rule of thirds used in composition for important information placement.
- Generally not used in typography competitions.
 |
Fig 2.1 Rule of Third, Week 2 (30/04/2024)
|
3. Typographic System
- The grit system, derived from letterpress printing, is the most commonly used system.
- The Swiss modernist style of typography, influenced by Joseph Muller Brockmann, Jan Tschichold, Max Bill, introduced excitement and engagement.
 |
Fig 3.1 Grid Systems, Week 2 (30/04/2024)
|
- Post-modernist era saw a shift towards chaos, randomness, and asymmetry, challenging order in typographical systems.
- Proponents like David Carson, Paula Scher, and Jonathan Barnbrook embraced this chaos, influenced by Punk anti-establishment thought and music.
- Asymmetry, randomness, repetition, dilatational, and radial systems began to dominate the designer lexicon.
 |
Fig 3.2 Random Systems, Week 2 (30/04/2024)
|
4. Environmental Grid
- Explores existing structures and extracts crucial lines.
- Organizes information around super-structure.
 |
Fig 4.1 Environmental Grid, Week 2 (30/04/2024)
|
- Unique combination of texture and visual stimuli provides context.
- System/structures developed around key environmental features.
5. Form and Movement
- Explores various grid options.
- Dispels seriousness of grid application.
- Views page turning as a slowed-down animation in image, text, and color placement.
 |
Fig 5.1 Static Spread, Week 2 (30/04/2024)
|
- Emphasizes movement created by form placement on page.
- Static versions of form placed on spreads, hidden grids.
- Visual connections and surprises on every page.
- Compositional exercises increase complexity with introduction of new elements.
 |
Fig 5.2 Grid Systems with Increasing Complexity, Week 2 (30/04/2024)
|
There is a fine line between genius and insanity, just as there is a fine line between legibility- readability & memorability.
-1st point came to Oscar from Levant, 2nd from Mr. Vinod.
Week 3 - Recorded (May 8, 2024)
4. CONTEXT & CREATIVITY
Handwriting
- Handwriting forms basis for form, spacing, and conventions in mechanical type.
- Influenced by tools and materials like sharpened bones, charcoal sticks, plant stems, brushes, feathers, and steel pens.
- Proto-Sinaitic Letter Forms
- Evolved into hieroglyphics, pictograph, or ideogram.
- Becomes foundation letter, Phoenician letter.
- Transition from pictorial representation to sound-based writing.
- Phoenician Letters Influence
- Phoenician letters influenced ancient Greek, Latin, and modern alphabet.
1. Writing System History
- Cuneiform: Early Writing System
- Used in various languages from 34C. B.C.E. to 1st century C.E.
- Distinctive wedge form created by pressing reed stylus into clay tablets.
- Characters evolved from pictograms.
- Written from left to right.
 |
| Fig 1.1 Hieroglyphics, Week 3 (08/05/2024) |
- Hieroglyphics in Egypt: 2613-2160 B.C.E.
- Egyptian writing system combines relief carving and rebus and phonetic characters.
- Hieroglyphic images can be used as ideograms, determinatives, or phonograms.
- Ideograms represent depicted things.
- Determinatives indicate general word idea.
- Phonograms represent sounds spelling out individual words.
- Phoenicians' Phonetic Alphabet
- Phoenicians developed 22-letter phonetic alphabet.
- Greeks adopted this alphabet.
- Early Greek letters were freehand, no serifs.
- Stroke thickness increased, aperture lessened, serifs appeared.
- Models for formal lettering in Rome.
- Roman inscriptional letters served as calligraphers' models for over two thousand years.
 |
| Fig 1.2 Early Greek, Week 3 (08/05/2024) |
- Roman and English Uncial Evolution
- Roman uncials evolved into rounded, curved forms for faster writing.
- In England, uncials evolved into slanted, condensed forms.
 |
| Fig 1.3 Roman Uncials, Week 3 (08/05/2024) |
- Carolingian Handwriting Reform led to Carolingian minuscule, a new script for legal and literary works.
- This script became the basis of lower-case Roman type.
 |
| Fig 1.5 Carolingian Minuscule, Week 3 (08/05/2024) |
- Gothic Art and Renaissance
- Gothic art, originating from Italy, spanned from 1200-1500 CE.
- Blackletter, characterized by tight spacing and condensed lettering, reflected Gothic aesthetic.
 |
Fig 1.6 Black Letter, Week 3 (08/05/2024)
|
- Italian Renaissance revived ancient Greek and Roman culture, focusing on letter form design and Carolingian script.
- Renaissance analysis emphasized letterform, resulting in a more rationalized letter.
 |
Fig 1.7 Italian Renaissance, Week 3 (08/05/2024)
|
- Movable Type Introduction in Korea
- Introduced in 1000-1100 CE.
- Korea achieved first printed book in AD 868.
- Koreans established bronze foundry for movable type casting.
- Koreans established bronze foundry in late 1300-1399 CE.
 |
Fig 1.8 Koreans Movable Type Casting, Week 3 (08/05/2024)
|
- Why do we talk about Greek influence on Rome, but not Egyptian or Near Eastern influence on Greece?
- Greek influence on Rome was influenced by the 19th century British Empire, which favored Greece and Rome over older, more influential civilizations like Ancient Egypt and China.
- European academic process created the discipline of "Indology" without visiting India, leading to the postulation of self-serving ideas like Aryan theory.
- The Phoenician letter marked a turning point in written language, possibly influenced by Egyptian Hieroglyphics and Hieratic Scripts.
 |
| Fig 1.9 Evolution of Middle Eastern Alphabets, Week 3 (08/05/2024) |
- Chinese script evolved from the Oracle bone to Seal Script, Clerical Script, Traditional, and Simplified scripts.
 |
| Fig 1.10 Evolution of the Chinese script, Week 3 (08/05/2024) |
- The Brahmi script (450-350 BCE) is the earliest writing system developed in India and is influential in all modern Indian and Southeast and East Asian scripts.
 |
| Fig 1.11 The Brahmi script, Week 3 (08/05/2024) |
- Southeast Asian Writing Systems
- Indian scripts, particularly Pallava, were the oldest in Southeast Asia.
- Malay Archipelago's Pra-Nagari, an early form of Nagari script, used in Sanskrit.
- Indonesia's most significant historical script is Kawi, based on Nagari but indigenous to Java.
- Kawi served as the basis for other scripts in Indonesia and the Philippines.
 |
Fig 1.12 Pra-Nagari, Week 3 (08/05/2024)
|
- Indonesian Writing Systems Overview
- Incung from Kerinci, considered the "tulisan asal."
- Jawi, an Arabic-based alphabet, introduced with Islam.
- Jawi is crucial in modern Malaysia for famous literature works like hikayat and Malay charm books.
 |
| Fig 1.13 Incung from Kerinci, Week 3 (08/05/2024) |
- Graphic Design History
- All writing systems have influence, and claiming complete originality is inaccurate.
- History provides context for designers to understand and communicate collective heritage.
- Software giants like Google are producing more vernacular scripts, employing Asian programmers and designers.
- Murasu.com in Malaysia has cracked the programming language for encoding different vernacular writing systems, now used in mobile phones and desktops.
- Local groups like Huruf and Ek Type are digitizing and revitalizing typefaces in Malaysia and India.
 |
| Fig 1.14 Baloo by Ek Type, Week 3 (08/05/2024) |
- Creativity and inspiration should begin by observing our surroundings and exploration of our collective histories you know so use your context to then create something original and make a mark in graphic design history.
looking behind gives you context looking forward gives you opportunities.
-Mr Vinod
Week 4 - Recorded (May 15, 2024)
5. DESIGNING TYPE
Xavier Dupré (2007) in the introduction of his typeface Malaga suggested two reasons for designing a typeface:
- Type design carries a social responsibility so one must continue to improve its legibility.
- Type design is a form of artistic expression.
1. Designing Type
- Adrian Frutiger
- A Swiss graphic designer, is credited with advancing typography into digital typography.
- Frutiger's typefaces, Univers and Frutiger, were designed for the Charles de Gaulle International Airport in France.
 |
Fig 1.1 Univers Font, Week 4 (15/05/2024)
|
- Frutiger received numerous honors, including the highest honor at the Varanasi university for designing a new Devanagari font for modern typesetting and printing processes.
 |
| Fig 1.2 Frutiger at National Institue of Design, Week 4 (15/05/2024) |
- Matthew Carter, son of Harry Carter.
- A contemporary British type designer and craftsman.
- Carter's fonts address technical challenges, such as those posed by early computers.
 |
| Fig 1.3 Georgia and Verdana Font, Week 4 (15/05/2024) |
- Edward Johnston's London "Underground" Typeface
- Completed in 1916, combines classical Roman proportions with humanist warmth.
- Ordered by London's Underground railway to unite companies using same rails and tunnels.
- Roman capital letter proportions applied, rooted in history and traditional calligraphy.
- Elegant, simplicity fitting modern age.
 |
| Fig 1.4 Underground Typeface, Week 4 (15/05/2024) |
2. General Process of Type Design
- Research
- Understanding type history, anatomy, and conventions.
- Understanding terminologies, side-bearing, metrics, hinting.
- Determining the type's purpose and applications.
- Examining existing fonts for inspiration and ideas.
 |
| Fig 2.1 In Traps, Week 4 (15/05/2024) |
- Sketching
- Traditional and digital tool sets used for sketching typefaces.
- Digital tools like Wacom can be quicker and more consistent but can impede hand strokes.
 |
Fig 2.2 Sketch by Johnston Sans, Week 4 (15/05/2024)
|
- Digitization
- Professional software like FontLab and Glyphs App are used for digitization.
- Attention should be given to the counter form, as readability heavily depends on it.
- Testing
- Testing is crucial in refining and correcting aspects of the typeface.
- Readability and legibility of the typeface are important considerations.
 |
Fig 2.3 Stenz By Mr Vinod, Week 4 (15/05/2024)
|
- Deploy
- Despite deploying a completed typeface, there are always teething problems that didn't come to the fore during prototyping and testing.
- Rigorous testing is important to minimize these issues.
 |
Fig 2.4 Prototype by Mr Vinod, Week 4 (15/05/2024)
|
- Utilizes circular grids like the Roman Capital grid.
 |
Fig 3.1 Grid for Roman Capital, Week 4 (15/05/2024)
|
- Facilitates the construction of letterforms.
- Requires consideration of various forms and constructions.
- Visual corrections include extrusion of curved forms, vertical alignment, and letter distance adjustment.
 |
| Fig 3.2 Classification According to Construction and Form, Week 4 (15/05/2024) |
The mindset of a type designer if clinically studied might be construed as sick; plagued by an unusual obsession to detail.
-Mr Vinod
2. INSTRUCTION
Requirements
- Laptop, Adobe Creative Suite, FontLab, Eportfolio (Blogspot), Gmail Ac, Facebook Ac, etc.
Submission
- Eportfolio: All gathered information (failures, successes, epiphanies, sketches, visual research, printouts, websites, images, charts, etc.) must be documented logically and chronologically in the portfolio for the task's duration in one post.
- Eportfolio: All images/sketches/diagrams/scans must be captured/photographed/scanned well with good, even, natural light, without shadows — use of tube/bulb/flashlight is not allowed. All images/sketches/diagrams/scans must be labeled (fig 1.), described and dated. Final submission must be indicated clearly (distinguishable from process work) and uploaded as PDF and JPEG (not PNG) or as instructed in class.
- (Only if instructed) Tasks to be documented in a printed A4 enclosed in a Clear Sheet, logically and chronologically. The works must be labeled and dated – use a pencil and write neatly.
3. Exercise 1 - Typographic Systems
For our first exercise, we need to explore the 8 systems in the lecture using the following content:
The Design School,
Taylor’s University
(we just need to use one of the titles)
All Ripped Up: Punk Influences on Design
or
The ABCs of Bauhaus Design Theory
or
Russian Constructivism and Graphic Design
Open Public Lectures:
June 24, 2021
Lew Pik Svonn, 9AM-10AM
Ezrena Mohd., 10AM-11AM
Suzy Sulaiman, 11AM-12PM
June 25, 2021
Lim Whay Yin, 9AM-10AM
Fahmi Reza, 10AM-11AM
Manish Acharia, 11AM-12PM
Lecture Theatre 12
1. Research
Besides the lecture video, Mr. Vinod also told us to read the "Typographic Systems Book by Kimberly Elam" These are a couple of notes on it.
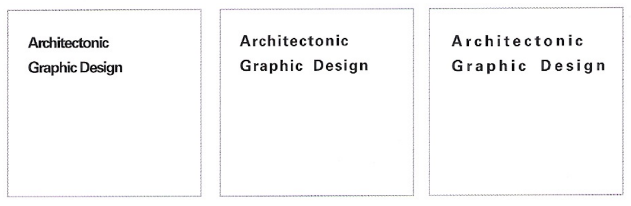
Constraints and Options
Line breaks, leading; words, and letter space. Provides subtle options to organize and structure the hierarchy of relevant texts together, and enhance readability.
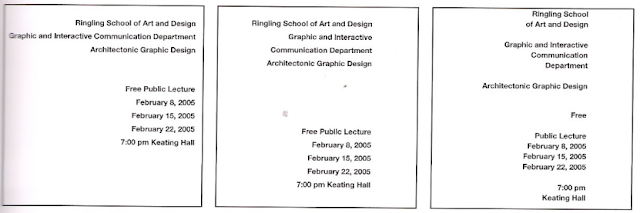 |
Fig 1.1 Line Breaks, Week 2 (30/04/2024)
|
 |
| Fig 1.2 Leading, Week 2 (30/04/2024) |
 |
| Fig 1.3 Word and Letterspace, Week 2 (30/04/2024) |
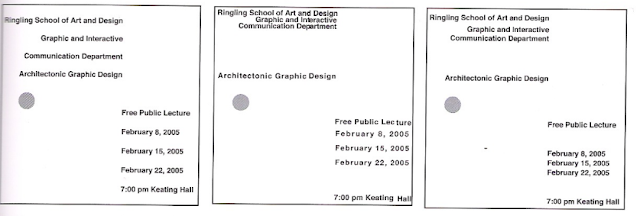
Elements and Composition
Circles and nonobjectives can be used to add that extra weight for a lot of things, to guide the eye, create a pivot point, tension, emphasis, and balance. To attract attention, and create a hierarchy.
 |
| Fig 1.4 Circle Elements and Composition, Week 2 (30/04/2024) |
 |
| Fig 1.5 Rule, Circle, Tone Elements and Composition., Week 2 (30/04/2024) |
2. Progress
This is the screenshot of the progress in InDesign.
.png) |
| Fig 2.1 Typographic Systems Progress, Week 2 (30/04/2024) |
.png) |
Fig 2.2 Typographic Systems Progress, Week 2 (30/04/2024)
|
.png) |
Fig 2.3 Typographic Systems Progress, Week 2 (30/04/2024)
|
.png) |
Fig 2.4 Typographic Systems Progress, Week 2 (30/04/2024)
|
While making systems, I realized it was easier to set the layout first, then put in the information, and then change the fonts, kerning, leading, and color. Sadly I realised this very late in the making and wasted a lot of time in the beginning making sure the composition looked good.
This whole ordeal could have been avoided if only I had just made sketches on paper first. *sigh* Lesson learned...
Most disappointed with the grid and bilateral, feel like I didn't do enough exploring on those systems, most of it is just random varied positioning and looking at other examples.
 |
Fig 2.5 Axial Typographic Systems, Week 2 (30/04/2024)
|
Though I wished that I could show mr everything I made to get feedback on all of them, cause I think that some of them have the potential to be good.
 |
Fig 2.14 Chosen Typographic Systems, Week 2 (30/04/2024)
|
 |
Fig 2.15 Chosen Typographic Systems, Week 2 (30/04/2024)
|
Mr gave some general and individual feedback, here's some that can be applied to my work too:
- Contrast: The colors need to be contrasting.
- Be careful with using Colors, black and red DO NOT look good.
- To be careful with kerning and leading, use it to associate sections of related info.
Specific feedback:
- Black and red are terrible contrasts on the radial and axial systems.
- The radial system, even though it has too many elements, is allowed because it works.
- The transitional system "flow" is too vague, but it can be amended.
- The 1st random system is too vague with a lack of clarity and readability, there needs to be some order in the chaos so you can still read the info. Mr liked the 2nd random system better.
- For the bilateral system, Mr also liked the 2nd one better.
3. Final Result
 |
| Fig 3.1 Radial, Week 4 (15/05/2024) |
 |
| Fig 3.2 Dilatational, Week 4 (15/05/2024) |
 |
| Fig 3.3 Grid, Week 4 (15/05/2024) |
 |
| Fig 3.4 Bilateral, Week 4 (15/05/2024) |
 |
| Fig 3.5 Axial, Week 4 (15/05/2024) |
 |
| Fig 3.6 Random, Week 4 (15/05/2024) |
 |
| Fig 3.7 Transitional, Week 4 (15/05/2024) |
 |
| Fig 3.8 Modular, Week 4 (15/05/2024) |
Fig 3.9 PDF with Grid, Week 4 (15/05/2024)
Fig 3.10 PDF without Grid, Week 4 (15/05/2024)
4. Exercise 2 - Type & Play
1. Research
1. Finding an image.
- The image selected must have a strong and consistent character, similar or repetitive in nature.
- If an image has too many different elements, the extraction would have inconsistent and varied attributes.
2. Deconstructing an image.
- We could outline the image or the identified shapes.
- It's important to observe the consistent shapes and forms of the object being studied.
- The nature of the lines and form.
4. Identifying letterforms.
- Identify letterforms within the outlined areas.
- The shapes may not look exactly like the desired letter but as long as it resemble its basic shape, it's okay.
5. Extracting letterforms.
- The letterforms are then extracted and placed on a baseline and in comparison to each other.
- Core characteristics are determined.
6. Identify a reference.
- Find a reference to guide the aesthetic, determining the shape or form of a letter.
7. Refining letterforms.
- The objective here is to refine the letterform to a consistent, uniform, and stylistically similar while retaining the core characteristic of the original object
- The characteristic need not be faithful to the original extraction and can evolve as long as it retains the essence of the object.
Advice from Mr Vinod during the briefing:
- Introduce consistency in height, width, and contrast.
- Deliberate on retaining or removing characteristics.
- Decide what areas require simplification.
2. Progress
I chose this image as I feel like this one is easy to extract letterforms from. Then going through multiple fonts and settled on Futura with its similar thin and straight characteristic.
 |
Fig 2.1 Chosen Typographic Systems, Week 3 (08/05/2024)
|
|
Then going through refining the letterforms changing a bit by bit, mainly reducing the thorns to make the letterforms.
Aditional Process:
I also made this as backup cause I feel like this one has a lot more character to it instead of the rigid thorn letterforms.
 |
Fig 2.2 Chosen Typographic Systems, Week 3 (08/05/2024)
|
|
Turns out that after feedback from Mr Vinod, my extraction captures too little detail and my revision does not have noticeable changes true, I was fixated on not changing the characteristics too much as I thought that would dampen the essence of the object. Mr said that I could take creative liberties and mostly change the letter forms to add the characteristics as it is a part of the refining process. Mr also suggested that I look at more similar images to learn in detail about the characteristics.
So I did take creative liberties and completely changed the letterforms. Mr said that it looked better and pointed out more details in the images.
 |
| Fig 2.1 Refinement, Week 4 (15/05/2024) |
I also used another method of extraction, I outlined one of the branches from the image and used the puppet warp tool to shape it into the letter C. It was too thin so I bulked it up carefully while keeping the thorns prominent.
 |
Fig 2.1 Extraction #2, Week 4 (15/05/2024)
|
 |
Fig 2.1 Refinement, Week 4 (15/05/2024)
|
 |
Fig 2.1 Refinement, Week 4 (15/05/2024)
|
After comparing the two letters C, the one from the image and puppet warp extraction looks more natural and does the "thorn branch" aesthetic more justice compared to my freestyle design.
 |
Fig 2.1 Comparison, Week 4 (15/05/2024)
|
So based on the letter finalized letter C I use the Futura font reference to make other letters with puppet warp to make sure the weight of each other is roughly the same then make appropriate adjustments to it.
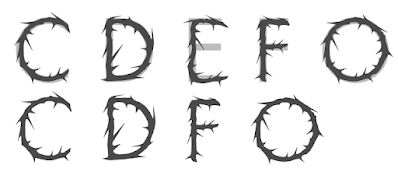 |
Fig 2.1 Refinement, Week 4 (15/05/2024)
|
For the poster, Mr. Vinod said to integrate the letter into the image, making them "interact" with each other. I changed the letterforms to red to give it the contrast to help guide the eyes to it first. Then I positioned them first in Illustrator and brought them to Photoshop, adding a couple of warm filters and a movie credit poster.
 |
Fig 2.1 Poster in Illustrator, Week 4 (15/05/2024)
|
 |
Fig 2.1 Poster in Photoshop, Week 4 (15/05/2024)
|
 |
Fig 2.1 Final Poster, Week 4 (15/05/2024)
|
|
Fig 3.5 Final Poster, Week 4 (15/05/2024)
|
5. Feedback
Week 1:
Briefing session for the first task and some tips:
- To watch the modular system video.
- To explore by yourself before taking inspiration from others to create your ideas and not basing them on other works.
- To balance chaos and order, the chaos can be used for "impact" to attract attention the order can be used for important info.
Week 2:
Mr gave some general and individual feedback, here's some that can be applied to my work too:
- Contrast: The colors need to be contrasting.
- Be careful with using Colors, black and red DO NOT look good.
- To be careful with kerning and leading, use it to associate sections of related info.
- Stop making the numbers bigger and the year and month on the bottom
- Use the alignment correctly, it gives the impression the designers don't know how to place their information correctly so they just use center alignment.
- Don't make the angle of the system(axial and bilateral) too much/aggressive
- Point size needs to be 8-12
Specific feedback:
- Black and red terrible contrast on the radial and axial systems.
- The radial system, even though it has too many elements, is allowed because it works.
- The transitional system "flow" is too vague, but it can be amended.
- The 1st random system is too vague with a lack of clarity and readability, there needs to be some order in the chaos so you can still read the info. Mr liked the 2nd random system better.
- For the bilateral system, mr also liked the 2nd one better.
- There is a bit of "flow" in the transitional but it needs a bit more fine-tuning.
Week 3:
General feedback:
- The letterform needs to represent the characteristic of the image, extracting it the wrong way gonna jeopardizes it.
- Letterforms need to have a consistent thickness of stroke and characteristic.
- Every letterform needs to have the weight of each other.
- The extraction needs to cover a large amount of detail to capture the core characteristics.
- Study the object during the whole process (especially refining), multiple images are okay.
Specific feedback:
- For Thorns:
- Needs more refinement.
- I'm allowed to take creative liberties and add or reduce the core characteristics of the letterforms.
- For Lettuce:
- Need to take macro extraction (larger).
- I could add/transfer some of the lettuce characteristics to the letterforms.
Week 4:
I was sick so I did not come to class.
6. Reflection
1. Experience
This exercise itself is not that tough, it just took loads of time. you need to do the research for understanding or else you going to do the task wrong and it needs a lot of exploration to see how minuscule detail affects the the whole design. It is fun to explore and research but it also exhausting especially with the other 5 modules with new tasks almost every week.
2. Observation
in the first exercise somehow I made most of my best design the first time and with the least time. Made it feel like I wasted a lot of time doing the other design for it, I put more time and effort into it. why do I work like this?
then in the 2nd exercise, I did not do enough research cause of the overwhelming tasks from the other modules and thus did it the wrong way, so I had to redo it(I made 2 of them too, I guess that's on me tho for making things hard for myself). Then I got sick from bad weather and stress, so I did get the important feedback from Mr. Vinod, my fingers are crossed I did well on the poster.
3. Findings
I didn't do any sketches for the first exercise and it cost me too much of my time, if I did it first before digitizing maybe could choose the best design right on the bat before painstakingly making 3 polished designs.
Still need to do the necessary research for the task before beginning, please for your(i) sake and health, don't do too much exploration (it's fun tho).
7. Futher Reading
"Typographic Systems Book by Kimberly Elam" These are a couple of notes on it.
Constraints and Options
Line breaks, leading; words, and letter space. Provides subtle options to organize and structure the hierarchy of relevant texts together, and enhance readability.
|
Fig 1.1 Line Breaks, Week 2 (30/04/2024)
|
|
| Fig 1.2 Leading, Week 2 (30/04/2024) |
|
| Fig 1.3 Word and Letterspace, Week 2 (30/04/2024) |
Elements and Composition
Circles and nonobjectives can be used to add that extra weight for a lot of things, to guide the eye, create a pivot point, tension, emphasis, and balance. To attract attention, and create a hierarchy.
|
| Fig 1.4 Circle Elements and Composition, Week 2 (30/04/2024) |
|
Fig 1.5 Rule, Circle, Tone Elements and Composition., Week 2 (30/04/2024)
|


.png)
.png)
.png)
.png)


Comments
Post a Comment